Monday, August 31, 2009

Is this how Home Depot views gardeners?!

Hmm...what's wrong with this picture? Do you regularly stand out in your garden and spray water into the air? I'm guessing not. The lady above seems to be spraying up into the air and over onto the gravel pathway. She's missing the plants!

This image was included in an email from the "Home Depot Garden Club". It's really exclusive ;) That picture makes me laugh because, as the text suggests, the latest "garden club newsletter" was all about saving water. Ironic, huh? Maybe instead of showing a lady spraying water into the air, they should have shown a drip irrigation system. Better still, they could actually carry a full line of drip irrigation supplies. (I had to go to OSH to get mine this year.) Goofy Home Depot. We have a love-hate relationship.

Saturday, August 29, 2009

Central Coast Tomato Taste Tests 2009 - Glacier

Welcome to the first edition of the "Central Coast Tomato Taste Tests 2009". I was inspired by Hanna's awesomeness. In fact, I found her "Tomato Tastings" so helpful that I decided to produce similar posts about the tomatoes I'm growing. Of course, these posts will have a special emphasis on cool-summer/early varieties. This is due to the non-tomato-y weather we have here on the Central Coast of California. So, without further ado, let the tasting begin!

The first tomato up on the chopping block is Glacier.

Seed Catalog Description:
An early, short-season, open-pollinated, potato-leaf variety that flowers when it is only 4-inches tall then sets loads of very flavorful 2 to 3-ounce, round, red tomatoes. Good flavor.
Days: 65
Size: Indeterminate
Color: Red
Season: Early-Season
Type: Heirloom

Production and Earliness:
My best plant has produced 91 tomatoes so far this season (end of August). The total production weighs in at 5.7 lbs. On average, the fruits weigh 1 ounce each. I picked the first ripe tomato on 7/21/09.

Fruit Size, Color and Shape:
Glacier produces lots of golf-ball-sized fruit. These tomatoes are bright red and they are mostly round, but can be heart-shaped or horizontally flattened.

Plant Growth Habit:
Glacier is a potato-leaved variety. It has sparse foliage and does not grow to great heights. My plants have stayed under 6 feet tall. It produces several branching inflorescences (flowering branches).

Texture:
Glacier is juicy, especially considering the small size. There is a lot of gel.

Taste:
Glacier is a sweet tomato with low acid. A pinch of salt really brings up the flavor. The taste isn't "knock your socks off", but it is pleasantly tomato-y.

Cooking and serving options:
Glacier is a bit limited in the cooking/serving department. The small size is fine for slicing as a side dish or topping a pizza. It is not a meaty tomato, but instead tends toward the more juicy end of the spectrum.

Is it a winner?
Glacier has an interesting growth habit, with is short stature and sparse potato-leaves. It would be good for a small garden or for people who don't want to get out ladders to pick tomatoes ;) Kids would be able to see all of the action up close.

Glacier is a pretty good producer in our cool climate. It has produced the 3rd highest poundage after Stupice and Early Girl. Notice how the seed catalog description said "good flavor". They didn't say more because there's really nothing left to say. It's not bad, but it's not great. I might grow Glacier again because it seems to produce well in a small space, but there are definitely better-tasting tomatoes for the heat-challenged.

Thursday, August 27, 2009

Tomato Sauce Recipes

Last week I posted on the tomato sauce I made. Heather asked me to post the recipe. There are actually 2 recipes that I've used to make tomato sauce. Both are from the US Department of Agriculture Extension. These recipes are tested for safety by the USDA, so we don't have to worry about spoilage.

The first recipe is:
(Click on the recipe for an enlarged view. You can also click on the processing time chart.)

The 2nd recipe is my husband's favorite, due to the spicy peppers I put in. It takes more effort to char the pepper skins and remove them, but the end result is quite tasty:
(Click on the recipe for an enlarged view. You can also click on the processing time chart.)

In all honesty, I don't always follow the recipes/rules shown here to the letter. Sometimes I might not have on hand one of the veggies that is listed. For example, I don't want mushrooms in my sauce, so I don't use them. Sometimes I only have 15 lbs of tomatoes, so I halve the recipe. I really don't think it matters, as long as we keep the tomato-to-other veg ratio pretty constant. Tomatoes provide acidity, which helps prevent spoilage. Happy canning!

Monday, August 24, 2009

The Happiest Place in Wal-Mart

Caning funnel and lids-
If you don't have a canning funnel, you've got to get one!
It makes the whole process much faster and less messy.
I got mine as OSH and it fits both small and large mouth jars.


I've noticed something. The canning section in Wal-Mart is the happiest, friendliest place in the store. Maybe in the whole town of Marina!

I drive a few extra miles to the Marina Wal-Mart store to buy my canning supplies. Sure I could by my lids at Safeway, but they were charging $4.69 for a package of 12 little metal lids! Wal-Mart's price: $1.50 for the exact same brand and item. I think I bought 11 packages of lids the other day...that a savings of about $35. Worth a couple of extra miles of driving.

But that's not the only reason I go there. I actually enjoy the canning section of Wal-Mart. They have lots of items to choose from. But most importantly, everytime I go, there seems to be another "canning person" in the aisle. Last time, it was a fisherman who really liked to can his extra sardines and shad. They're "fantastic", he said with a big smile.

Most recently, there was a lady in the canning section who eagerly asked me what I was canning. I said "everything that comes out of my garden"! I told her about the plum jam, strawberry jam and preserves, tomato sauce, beans, and zucchini pickles. She, herself, was wanting to can strawberries. She visited the fair last week and became inspired by all of the preserves entries in the local competition.

Nobody ever talks to me when I'm in the shampoo section or on the toothpaste aisle. It's the canning section that gets people talking and I love it!

Saturday, August 22, 2009

Growing and Canning Purple Podded Pole Beans

Growing Purple Podded Pole Beans
This is my first year growing beans. And I can assure you it will not be the last! I've been so surprised by how well they have grown. I choose a variety "Purple Podded Pole Beans" from Reimer Seeds.
In the spring, I painted an old 7-foot trellis bright blue. As I was painting, I wondered, "Will the beans even grow even half this tall?" "Seven feet is pretty high!" But the package said "Pole Beans", so I stuck the trellis in the ground and secured it to the fence. The seeds went in at the beginning of the summer. It was agonizing waiting for them to sprout (it was probably only about 8 days in reality). But after that, they were off to the races! They quickly grew to the top of the 7-foot trellis and began to twist in the wind for several more feet over the top. I tried to wind them back in along the top of the trellis.
Then, flowers, lots of them; a pretty magenta-purple color. Next, baby beans, so cute. Don't you just love baby anything? And finally, as the baby beans grew, they began to turn fully dark purple at about 6-7 inches long. After a couple of days, I had enough to make a meal for my husband and me. Yee-haw! I was so excited, that I selected some of my freshly dug Colorado Rose potatoes to go along with the beans. The Colorado Rose is a beautiful potato...a lovely rose-pink on the inside. As I was cooking along, I realized that we were going to have a meal of pink potatoes and purple beans! Just imagine that on a plate together. Weird! Maybe too weird...even for me! But in fact, the purple podded pole beans turn green as they cook and the pink potatoes lighten in color significantly. So, we had a light pink and green meal, instead. The most important thing is that it tasted great!

Since the initial sowing of the PPP beans, I have picked over 7 lbs from a single 6 foot row. The first picking session occurred on July 17 and now, by August 22, they are finally starting to slow down in production. This is such a great vegetable for a small space. It only took up a 6 square feet of growing space and not only that, the plant is beautiful to look at. This is typically important for micro-veg gardeners, who grow right outside their back doors. Not everyone has the luxury of "the back 40".

I have also compared the growth of the Purple Podded Pole Beans to that of Painted Lady Runner Beans and Scarlet Runner Beans. I planted both types of runner beans in early June and they have grown so SLOWLY. They have beautiful flowers, but they haven't reached the top of their 7-foot trellis and they just look kind of weak. To put it simply, they aren't "earning their keep"! About 2 weeks later at the very end of June, I planted another round of Purple Podded Pole Beans next to the runner beans. The purple beans have, again, taken off and are past the top of their 7-foot homemade trellis. Even though the PPP beans were planted later, they already have baby beans showing, while the runner beans limp along. Here's a picture of the PPP beans on a trellis made from plum tree stakes and garden twine.
I decided that the twine didn't have to be tied at right angles. It's a bit of an "art installation" ;)
So, PPP beans >>> runner beans (at least for me).


Canning the Beans
I've picked so many beans that I had to can some. It's really simple to do if you have a pressure canner. Here's how I do it:
1) Wash the beans and line them up on a cutting board, all facing the same way.
2) Cut the "stem ends" off. Some people cut both ends off, but the tails don't bother me.
3) Cut them into sections and place in a jar to within 1" of the rim.
4) Pour boiling water over to top to within 1" of the rim.
5) Place a lid on top and a screw cap ring.
6) Process in a pressure canner for 20 minutes at 10 lbs.
7) Save for winter, if you can make it that long :)

Wednesday, August 19, 2009

Central Coast Tomato Trials - part 8

At this point in the trials, I have picked over 30 lbs of tomatoes. The heaviest producer is Stupice, with an average of 47 tomatoes per plant, totaling 3.61 lbs.

Following closely are:
Glacier (58 tomatoes totaling 3.68 lbs),

Sungold F2 (185 tomatoes totaling 3.50 lbs), and

Paul Robeson (10 tomatoes totaling 3.39 lbs).
Some notes on the cool-summer varieties that I'm growing:
Camp Joy - a small red tomato; the first to set fruit; good flavor
Early Girl F2 - 2 plants vary wildly. One has jumbo tomatoes and regular leaves; the other has several small-medium tomatoes and potato leaves.
Glacier - a compact plant that's only 4 feet tall and rather narrow; it has potato leaves and is a heavy producer of small red tomatoes; good flavor
Lahman Pink - the latest to produce ripe fruit; light red tomatoes of various sizes; ok flavor
Nepal - slow to produce fruit; red tomatoes of various sizes, some large; good flavor
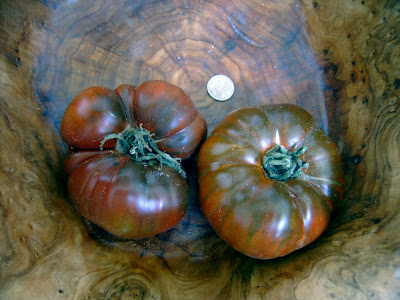
Paul Robeson - slower to produce ripe fruit; multi-color, from maroon to green to orange; medium and small fruit; BEST flavor so far
San Francisco Fog (F2?) - slow to produce fruit; leaves curled upward; light producer
San Marzano F2 - slow to produce fruit; red paste tomatoes, most are quite large; good flavor
Stupice - first to produce ripe fruit; smallish-medium red tomatoes; meaty, good flavor
Sungold F2 - 2 plants vary wildly. One has small red cherry tomatoes, but very few. The other is fantastic with loads of delicious, large, orange cherry tomatoes.
Sweetie - not growing well or producing well; small red cherry tomatoes

Monday, August 17, 2009

Seed --> Plant --> Tomato --> Sauce

I made 6 pints of tomato sauce from all of the varieties that I had on hand; whatever was ripe. Summer in a jar:


While I was stirring the sauce as it simmered on the stove, I started to think about January. That was the beginning of my tomatoes' life cycle. I started the seeds at the very end of January. Every morning I carried the seedlings outside to the greenhouse to spend the day. In the evenings after work, I would faithfully bring them inside to stay cozy and warm. After about 4-6 weeks, I potted them up to 1 gallon containers. Finally, in April they went into the ground. I planted them deeply, cutting off the lower leaves and burying the stems up to the top couple of nodes. Right after they were planted out, we faced a crazy windstorm that lasted 2 days. The next week the little plants were tested by an attack of aphids and white flies. I battled the pests with soapy water and we prevailed. On July 4th the first ripe tomato was picked - a dependable Stupice. Later in July, I panicked and sprayed milk at the first sign of yellowing lower leaves. Now, by mid-August there are enough tomatoes ripe at one time to warrant a round of canning.

What a long, strange trip it's been ;)

Don't you just love wierd-looking tomatoes?! This is Stupice, a great cool-summer, heavy-producer of small-medium tomatoes. They have a good taste...not great, but they are nice and meaty and can make a good sauce.

Saturday, August 15, 2009

Garden Blogger's Bloom Day - August 2009

Pink Cosmos

Lily? (it was here when we bought the house)

Feather Grass

Unknown succulent

White Agapanthus

Yellow Marigold with bee friend

Easter Lily (saved from the trash at my church 3 years ago)

Phalaenopsis orchid ($3.82 at a local grower's nursery)

Orchid - Encyclia prismatocarpa

Orchid - Odontoglossum hybrid

Orchid - Lycaste aromatica

Painted lady runner beans

Strawberries (Eversweet)

Artichoke flowers

Zucchini (Italian Romanesco)

Cilantro

Brocade Corn (sunlight shining through the leaves)

Brocade corn (tassel)

Fuchsia

I'm thinking about entering Gardening Gone Wild's Photo Contest. Definitely no chance of winning. I just don't want to embarrass myself. So, if you don't mind helping me out, please let me know which of the last two photos you like the best. Thanks!

Wednesday, August 12, 2009

Gardening-related Book Review: Wicked Plants

This is a completely unsolicited book reviews, but I hope it's not unwelcome :)

"Wicked Plants:
The Weed That Killed Lincoln's Mother and Other Botanical Atrocities" by Amy Stewart

First of all, look at the book!
Nice, huh? I know we shouldn't 'judge a book by it's cover', but it's okay this time. The great design and illustrations match quite well with this interesting read. (Love the gold tassel!) The book is laid out like a series of (very) short stories on individual or related groups of wicked plants. "Wicked plants" might fall into one of these categories: illegal, dangerous, deadly, etc. It was interesting to learn about the sordid history of so many plants from all over the world. Plants have even changed the course of history a time or two. We tend to think of plants as "innocent" and "lovely", but some folks think of them as murder weapons. Ouch! And then, there are the people looking for an escape from reality...geez, people get high off all kinds of vegetation. Who knew? Well, Amy Stewart does and she'll tell you all about it in Wicked Plants. You can find out more on her blog. I've read all of Amy's books and my personal favorite is "From the Ground Up", about her adventures in starting a first garden in Santa Cruz, CA.


Monday, August 10, 2009

Ground Cherry - Physalis peruviana

Ground cherries taste like a cross between a pineapple, a tomato, and a strawberry. But that's not it...there's something else in the flavor, but I'm not quite sure what it is. They are different, but good. This is my first year growing ground cherries and at first I thought they were smaller than normal. A quick check online showed me that mine are, in fact, the normal size. It took a while to get going in my garden, but now it's growing well and producing some fruit. It doesn't seem bothered by any pests or diseases. I'll definitely grow it again next year. I've heard that people use the fruit to make jam, bake in pies or just eat fresh.

According to Wikipedia:

"Physalis peruviana, commonly known as physalis, is indigenous to South America, but was cultivated in South Africa in the region of the Cape of Good Hope during the 1800s, imparting its common name, cape gooseberry.

As a member of the plant family Solanaceae, it is related to a large number of edible plants, including tomato, eggplant and potato, and other members of the nightshades. It is closely related to the tomatillo but not to the cherry, Ribes gooseberry, Indian gooseberry or Chinese gooseberry, as its various names might suggest.

The fruit is a small round berry about the size of a marble with numerous small yellow seeds. It is bright yellow and sweet when ripe, making it ideal for snacks, pies or jams. It is popular in fruit salads, sometimes combined with avocado.

Its most notable feature is the single papery pod that covers each berry. Because of the fruit's decorative appearance, it is sometimes used in restaurants as an exotic garnish for desserts. If the fruit is left inside the husks, its shelf life at room temperature is over 30-45 days.

Physalis peruviana has a variety of names, mostly of geographic or language use, such as Aguaymanto, cape gooseberry, poha berry, ground-cherry, Peruvian cherry, harankash, golden berry, uchuva, Inca berry, uvilla, capuli or sfivalis.

Native to high altitude tropical Colombia, Chile, Ecuador and Peru where the fruits grow wild, are casually eaten and occasionally sold in markets but the plant has become only recently an important crop, it has been widely introduced into cultivation in other tropical, subtropical and even temperate areas."


Has anybody else grown ground cherry? What did you think?

Saturday, August 8, 2009

Artichoke bouquet for the bees

I've been wanting to cut back the artichoke plant for weeks. But every time I went out to look at it, another flower had opened, and the bees were all over the place. Didn't have the heart to chop down a bee resource. So I waited...

Then a couple of days ago I noticed that all of the artichoke flowers had finally opened. So, I made a bee bouquet and put it in the backyard.

A friend told me she saw artichoke flowers for sale at an Oakland farmer's market...$5 a stem. I guess that makes this a $30 bouquet - wow! Maybe I should put that in the garden harvest tally... Plus all the other artichoke flowers that bloomed while still on the plant; there's been at least a dozen over the last couple of months.

Now, I can cut back the artichoke plant like I'm supposed to! Had to use a saw...the main stalks were a few inches thick. Now, I'm hoping for a fall crop of artichokes, though my "bee-love" may have made me miss that opportunity :)

Friday, August 7, 2009

Milk spray for fungal treatment on tomatoes - BEWARE!

Sometimes the treatment is worse than the disease.

In a knee-jerk reaction to a little bit of yellow on the lower leaves on my tomato plants, I decided to spray a milk and water solution (1:1). Of course, I read about it on the internet :) So, I sprayed half my plants once a week for 3 weeks with this organic and "safe" alternative. At least I thought it was safe. After the 3rd application, I noticed a fuzzy black mold on the leave surfaces that got the milk treatment. I'm 99% sure that the mold is due to the milk. Maybe a weaker solution would have been better? We don't get rain in the summer, so there was no chance of the milk solution washing off. In fact, I began to hate the look of the leaves with the crusty dried milk solution..which then morphed into mold. I'm pretty sure there would have been less damage, if I'd just left the plants alone. The other half of the plants that didn't get my "treatment" look much better. No black fuzzy mold. I actually sprayed them once with a cornmeal solution. But then, I ran out of cornmeal and forgot to spray again - probably for the best!

The moral of this story is don't believe everything you hear...or read...please...for your garden's sake.

Oh well, the tomatoes are going to survive my silly treatment. I can see plenty of new growth and suckers. Some would be 10 feet tall, if I had stakes that height! Instead they are sort of flopping over after reaching the tops of the stakes. I just tasted Paul Robeson - delicious! Gotta love that coloring; it matches my vase:

Wednesday, August 5, 2009

Central Coast Tomato Trials - part 7 - Sungold seed giveaway

Here are some funky "double" tomatoes and one really strange Sungold F2 - the little red one in front.

The Sungold that I chose for a winner in the recent taste test is actually an F2. I've been told that Sungold is a hybrid. My neighbor gave me a seedling last year and I saved seeds. I planted those (F2) seeds this year. I'm growing 2 plants and they have some obvious differences in leaf shape, productivity, fruit size, and fruit color. Sungold (the hybrid) produces loads of nice-sized orange cherry tomatoes with a 'bright' flavor. An example of the "better" Sungold F2 is the orange double in the photo, while the "not-so-good" one is the little red one in front. I plan on saving more seed from the really good one.

If you are interested in seed, please leave me a comment. I'll then email you and ask for a self-addressed, stamped envelope...or maybe a seed exchange.